• We apologize for the somewhat convoluted sign-up process. Due to ever-more sophisticated attacks by chatbots, we had to increase our filtering in order to weed out AI while letting humans through. It's a nuisance, but a necessary one in order to keep the level of discourse on the forums authentic and useful. From the actual humans using WCP, thanks for your understanding!

Peel's Coho build

I had success with the stick method. For the stick, I used an old broom handle with a long taper cut to hold the syringe at an angle. But it was the syringe that made it work great. I used an old horse de-wormer syringe. It was about 1" in diameter and 5" long with about a 3/16" diameter opening. I mixed wood flour to a little thicker than honey and it worked great. Truth be told- I did try it with the Pygmy supplied syringe first and almost had a catastrophic anger meltdown. 8O :oops: :lol:
 
I just finished up a big deadline at work, so I'm able to get back to kayak building. I decided to go ahead with the soft padeyes for the bungy rigging and hatch straps, but will figure out an alternate connection for the bow and stern connection points for a perimeter line since I won't be able to reach the inside of these from the hatches.

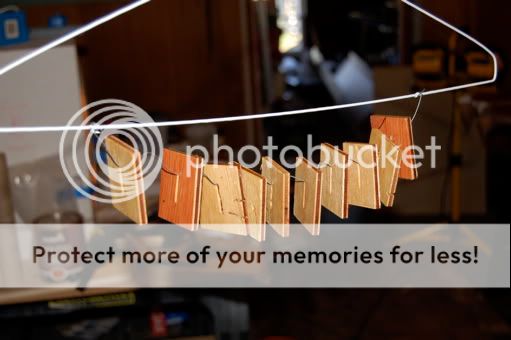
Hatch Strap blocking saturation coat:
StrapBlocks.jpg


Look familiar? A great idea deserves to be reused. Thanks Mark!

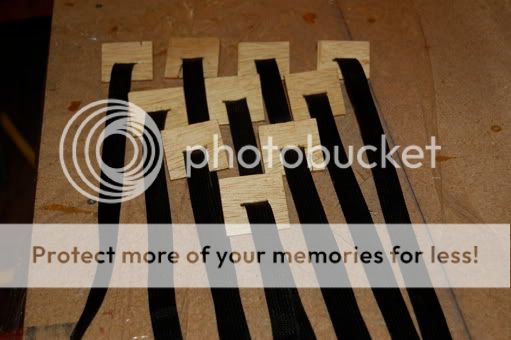
Blocking with straps in place
HatchStraps.jpg


Slit in deck for hatch strap to pass through
StrapSlit.jpg


Now I need to cut the wider slits for the double thickness of webbing the padeyes will require. I did a little layout with some tape to make sure I've got everything where I want it; it would be a real bummer to cut the holes in the wrong location :cry:
RiggingLayout.jpg
 
Looking good Pete!

What did you use to cut the slots?

Also, you'll want to make sure that your squares of wood holding the padeyes are not too wide that they'll interfere with the edges of the deck sheer panel (the narrow panel). Also, you'll want to smooth out the rough edge of the tape on the inside of the sheer, so your squares don't sit any more proud than they have to. This will minimize the chances of leaking (something I should have paid a bit more attention to!). Finally, don't use Sikaflex when you install them - RTV is supposed to be good stuff (although I've never used it personally).
 
Mark_Schilling said:
Also, you'll want to make sure that your squares of wood holding the padeyes are not too wide that they'll interfere with the edges of the deck sheer panel (the narrow panel). Also, you'll want to smooth out the rough edge of the tape on the inside of the sheer, so your squares don't sit any more proud than they have to. This will minimize the chances of leaking (something I should have paid a bit more attention to!). Finally, don't use Sikaflex when you install them - RTV is supposed to be good stuff (although I've never used it personally).

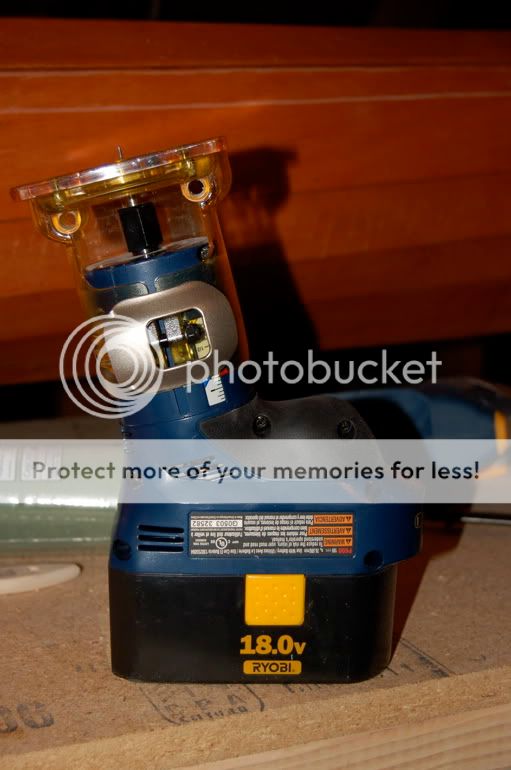
Thanks for the tips Mark. I had already smoothed down the tape edges when I read your comments on not getting the blocks to seat properly on your Tern. My blocks are 2" x 1-3/8" I've dry fit them into the tightest spots already and they seem to fit nicely. To make the slots, I used a trim router fit with a 1/16" plunge bit. The tricky part of this setup though is that the cutting head on the bit is exactly 4mm deep, which means that I have to set the depth on the router exactly, as I could either be over or under - neither of which would do me very good.

View of Trim Router with 16" plunge bit
TrimRouter.jpg
 
It took a little while to get the bulkheads trimmed to the correct size. There's still a little gap here and there, but I'm confident that by the time they're glassed in place they will be water-tight.

I found that the fore bulkhead sits tight against the foot peg runners, so it was helpful during the sizing phase as it gave me a consistant reference point during my many trial fits.

Fore Bulkhead
ForeBulkhead.jpg


For the stern bulkhead I placed a couple of heavy bricks in the hull to do the same job of providing a reference point. Both bulkheads fit quite snuggly, so they won't need any additional support when I fillet and Glass them

Stern Bulkhead (that's a shadow at the top of the bulkhead where my flash cut off, not a huge gap :? )
SternBulkhead.jpg


I decided to take Art's good suggestion, and named my kayak with the orca on it after Luna. Here's a shot of the builder's info I placed on the rear bulkhead:

BuildersPlaque.jpg
 
Very cool looking name plate Pete and I like the look of that cordless trim router (I recently purchased a 18V Milwaukee combo set... men and their tools). Question you may or may not be able to answer... how difficult with the Pygmy's would it be to move the front bulkhead back to use as a footrest?
 
jurgenk said:
how difficult with the Pygmy's would it be to move the front bulkhead back to use as a footrest?

The difficult part would come from the fact that at the place you'd probably like to place it the boat is wider/taller than the stock location, so you'd have to start from stratch in creating a new bulkhead (unless of course you're 7' tall or so :) ) But that wouldn't really be much different from what I had to do in sizing the blukhead to fit in the position I placed it. I cut a cardboard template a little smaller than I thought it should be, and then used a 1/2" thick piece of wood as a scribe to mark the exact shape of the hull to the cardboard. I then transfered these marks to another piece of cardboard (again using the 1/2" offset). Once I had a decent fit, I copied it to the plywood and filed it down to size.
 
jurgenk said:
how difficult with the Pygmy's would it be to move the front bulkhead back to use as a footrest?
Pete's solution is a good one. I did not have any pieces of okume large emougn to make an entire bulkhead, so I scabbed some scraps to the provided stock bulkhead (butt-jointed), first using a variation of his method to establish a reference outline on the original (too small) bulkhead an inch inside the desired line. After the glass is applied, it is plenty strong.

I gotta have one of those trim routers -- what model is that, Pete?
 
Astoriadave said:
I gotta have one of those trim routers -- what model is that, Pete?

It's a Ryobi P600 Trimmer. It's sold as an add-on to their system, which means that they assume that you have other Ryobi 18V tools, so a battery and charger are not included in the box. I happen to have most of their 18V line, so this worked out great for me, as I'm not paying more for something I already own. If you have already invested in another system, you might see what they have to offer.
 
I had planned on sanding down the boat this weekend and applying the finish, but as usual things took quite a bit longer than I planned on. I thought giving myself 4 hours to sand the boat using a RO sander would be enough. Well, it took the whole 4-hours just to go over everything with the 80 grit. The drips down the sides of the hull from when I epoxied on the deck were quite extensive, especially at the bow and stern, where the sides were beyond vertical when I was epoxying.

Here's the hull after being sanded with 80 grit:
HullSanded.jpg


It was unbelievable, the amount of dust that was produced. All I can say is that it's imparitive that you wear a particle mask, and one that fits snuggly.

Here's what I looked like after 4 hours of sanding 8O
SandyPete.jpg


No, my hair is normally dark brown, so either that's a lot of dust, or this boat building thing prematurely ages you :lol:

In the process of getting everything smooth with the 80 grit, I exposed the glass in a few areas. Not a lot, and I didn't sand through it, but I think I'll put one more light coat of epoxy on before going further. Hopefully I can get the epoxy on smooth enough, that I can pick up with the 150 grit once it cures.
 
hey Snowman! :D
i always hook my shop-vac up to the ROS when i'm sanding large areas, like a boat. :D take the filter out of the vac occasionally and shake it out. it'll keep the shop and you a whole lot cleaner, and your sandpaper will last longer.
DarenN....
 
As DarenN says, the shop vac hooked up to the ROS works incredibly well. I highly recommend doing so as it makes the job a lot less messy.

Your boat is looking really good Pete!

*****
 
Dan_Millsip said:
As DarenN says, the shop vac hooked up to the ROS works incredibly well. I highly recommend doing so as it makes the job a lot less messy.

Will definitely have to do that for the next round of sanding. Will just need to pick up an adapter to neck down the shop vac hose to the proper size for my ROS outlet, and maybe get a longer hose, so I'm not moving the shop vac every two minutes.

I was genuinely surprised at how much dust the sanding phase created. It's not like I was removing all of the epoxy from the boat, but looking at how much I ended up vacuuming up it sure looks like it :?

Dan_Millsip said:
Your boat is looking really good Pete!

Thanks Dan. I've really enjoyed working on this project. It's hard to believe that it's nearing the end.
 
Dan_Millsip said:
As DarenN says, the shop vac hooked up to the ROS works incredibly well. I highly recommend doing so as it makes the job a lot less messy.
I am totally embarrassed to admit that it was just this afternoon I discovered that my ROS has a fitting at the back that indexes with the entry hose to my shop vac. After what seems like weeks of sanding of my boat hull, I guess it's about time! Sure does cut down on the dust!

Done with the 80 grit and the 120 grit -- on to the 220! :oops: :lol:
 
What a difference hooking up the shop vac to the sander made! Sure there was still dust in the air, but it amounted to less than a tenth the amount I has dealing with before.

I finished sanding the kayak down this morning going from the 80 through 150 and 220 grits. These finer grits went alot faster than the initial 80 grit sanding, because by this time everything was smoothed out.

After sanding I washed down the boat with some hot water with a little dish washing soap in it, then rinsed it with hot water twice, changing the water in the bucket between rinsings.

Rub-A-Dub Yak
Rub-a-dubYak.jpg


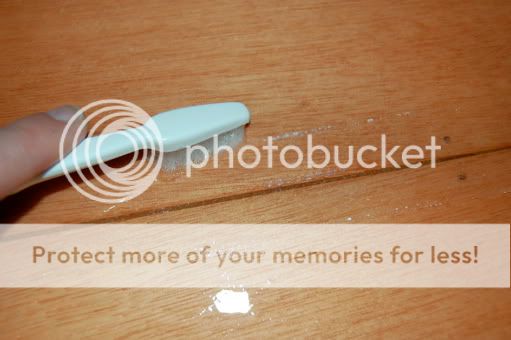
I had a few spots where there were small pinholes in the epoxy that the sanding dust settled into. This was mostly along the sacrificial keel tape, where the edges of it has been scraped/sanded smooth. I found that using a toothbrush and the hot, soapy water made quick work of getting the dust out of the holes.

Smile.jpg


After the kayak bath, I vacuumed up all the dust in the room, and tarped the ceiling to help prevent dust from settling on the boat as I apply the finish. I also sprayed the air with a fine mist of water to help anything still floating around to settle out.

Tarped.jpg


Now on to finishing!
 
I decided to go with a LPU finish, but talking with the guy at my local boat supply store, decided to go with Bristol Finish's LPU, instead of SystemThree's. The reason behind this decision is that the Bristol Finish supposedly has a bit more build to it than the SystemThree, so will do a better job of filling any low spots and holes. The guy at the store also said that he's heard from customers that they've had better luck getting a brushmark-free finish from the Bristol.

Bristol_Quart_Kit.gif


Like the System three it's a two-part polyurathane, but is solvent based instead of water based, so you need to have decent air circulation. It has a pot-life once mixed up about 4 hours, but once it's rolled/brushed on should be dry enough for a recoat in about an hour.
 
Back
Top